Docker tutorial
Getting Started
The command you just ran
Congratulations! You have started the container for this tutorial! Let’s first explain the command that you just ran. In case you forgot, here’s the command:
docker run -d -p 80:80 docker/getting-started
You’ll notice a few flags being used. Here’s some more info on them:
-d- run the container in detached mode (in the background)-p 80:80- map port 80 of the host to port 80 in the containerdocker/getting-started- the image to use
You can combine single character flags to shorten the full command. As an example, the command above could be written as:
docker run -dp 80:80 docker/getting-started
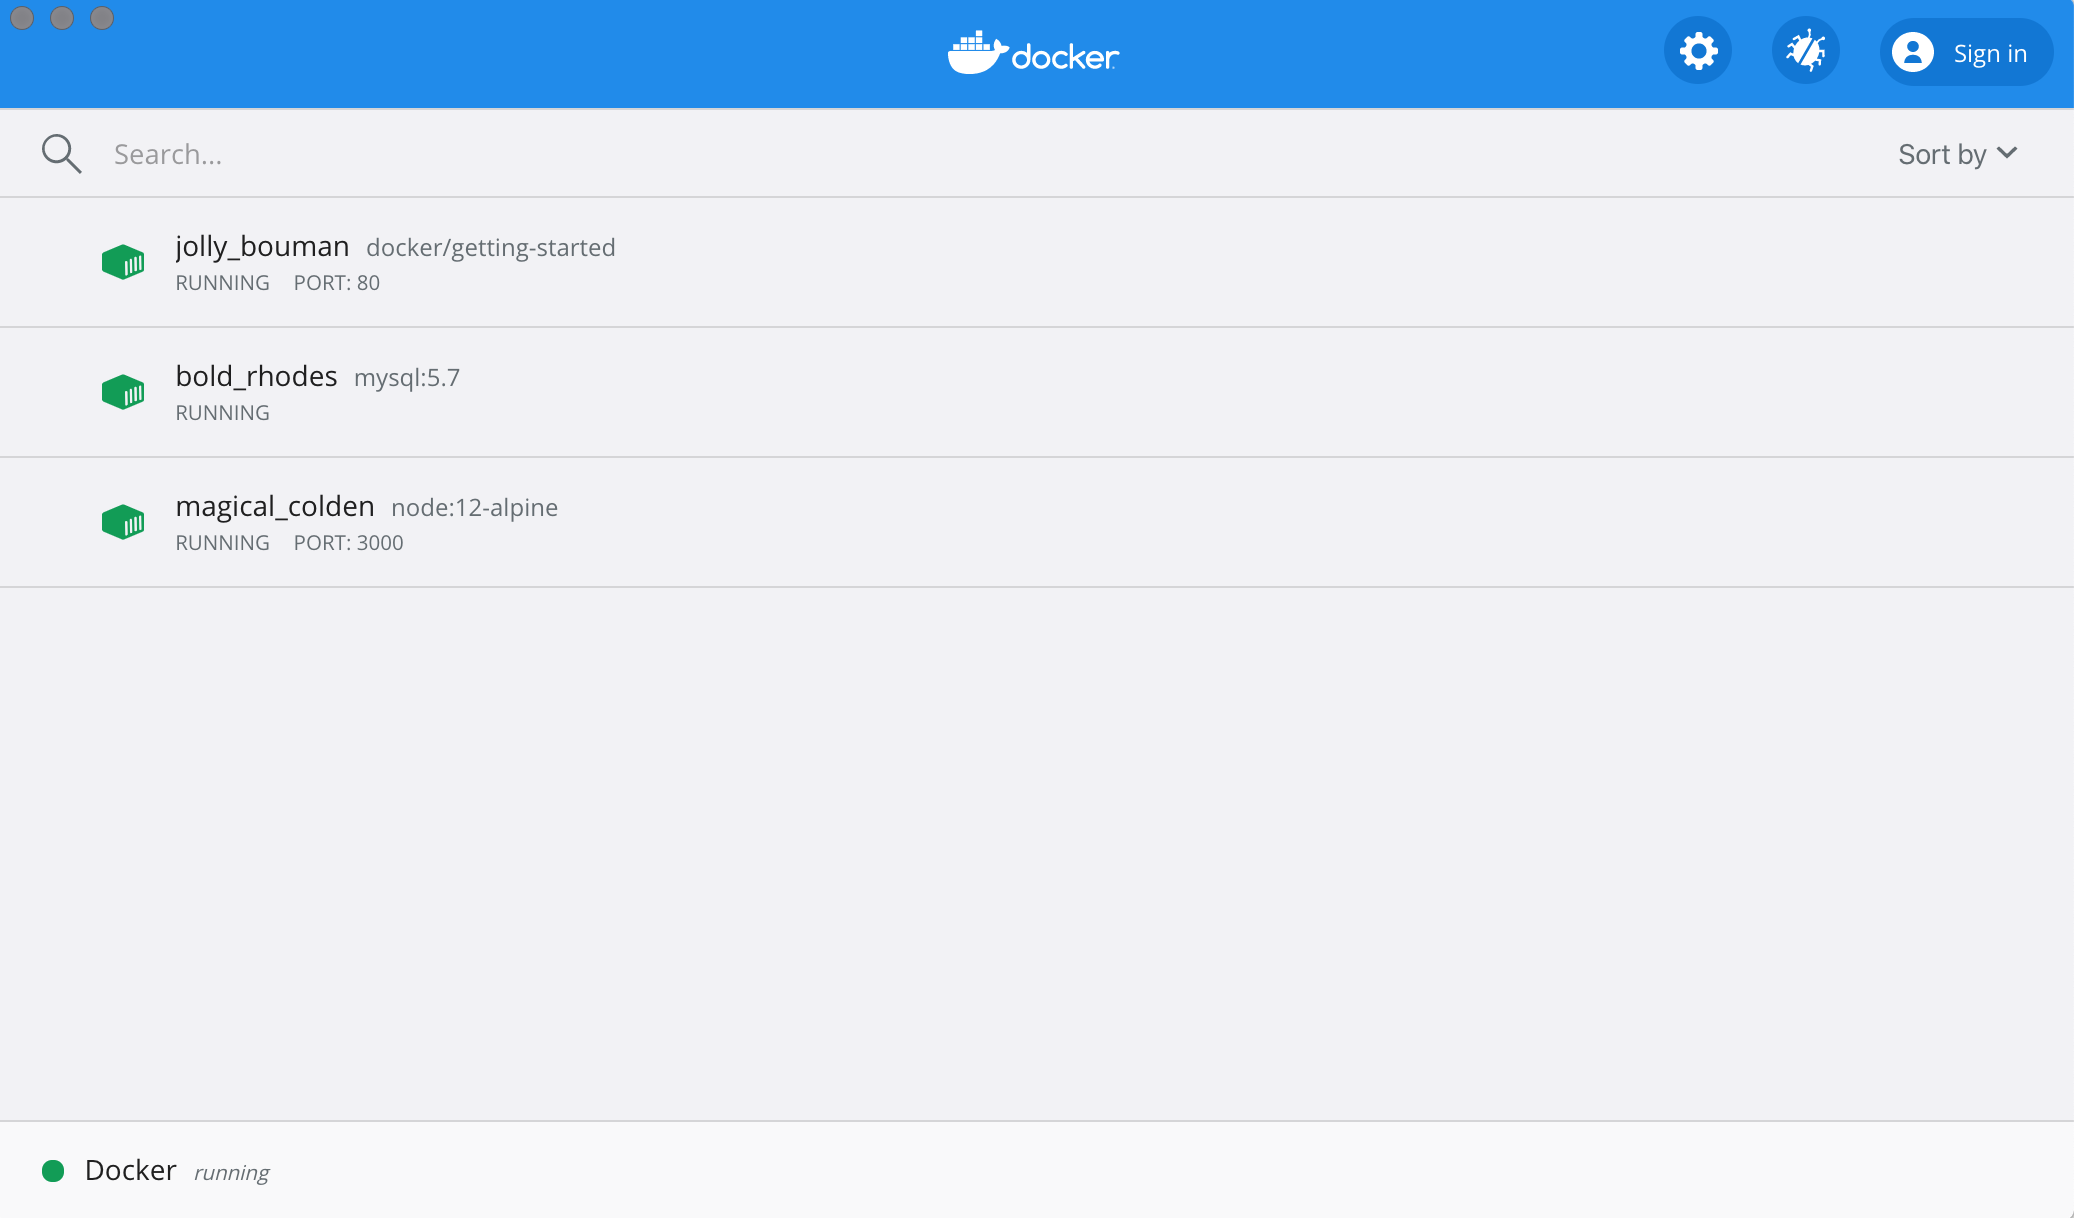
The Docker Dashboard
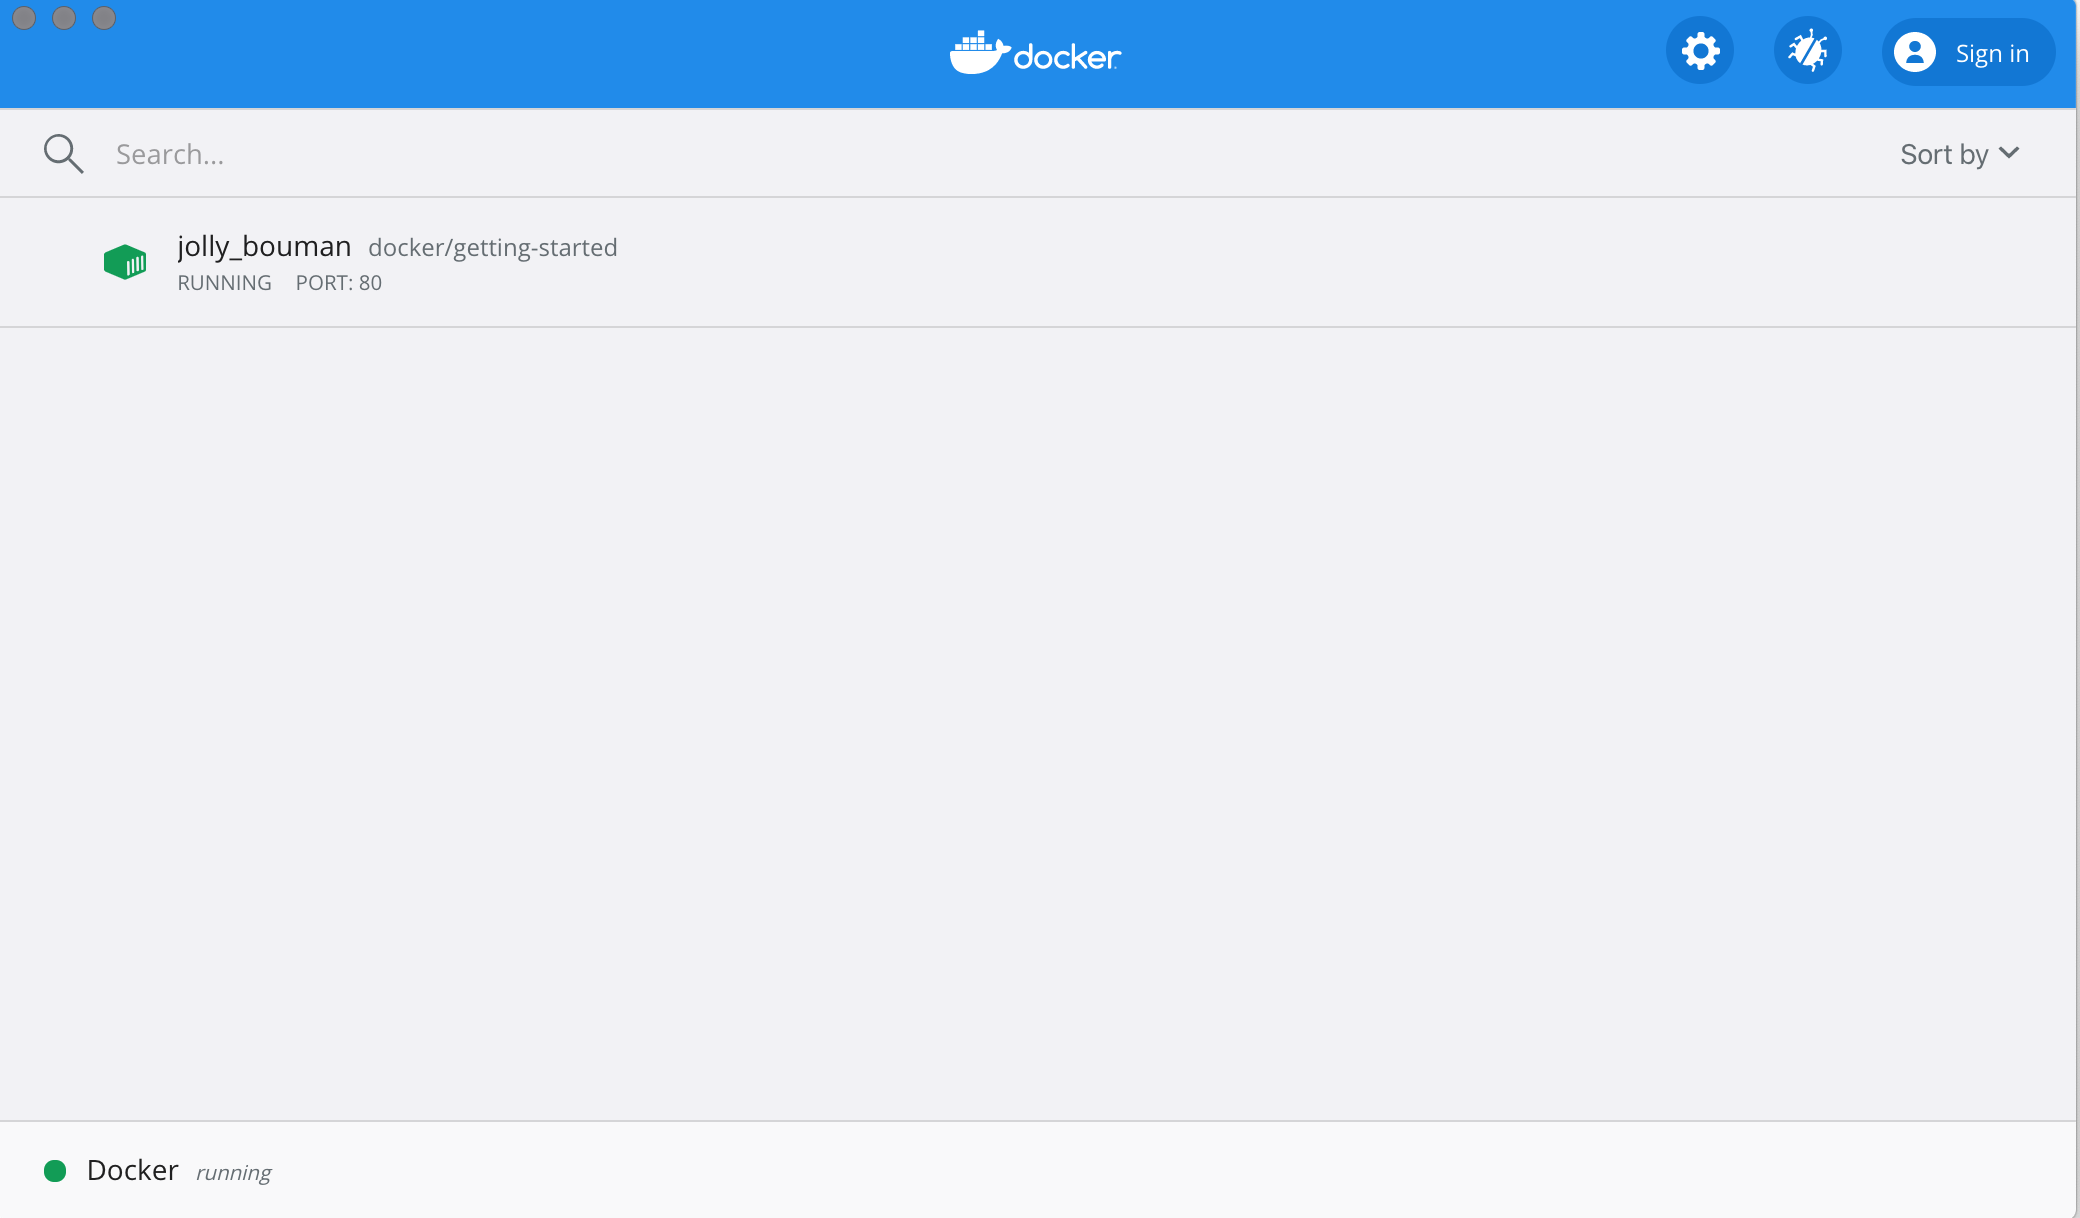
Before going too far, we want to highlight the Docker Dashboard, which gives you a quick view of the containers running on your machine. It gives you quick access to container logs, lets you get a shell inside the container, and lets you easily manage container lifecycle (stop, remove, etc.).
To access the dashboard, follow the instructions for either Mac or Windows. If you open the dashboard now, you will see this tutorial running! The container name (jolly_bouman below) is a randomly created name. So, you’ll most likely have a different name.
What is a container?
Now that you’ve run a container, what is a container? Simply put, a container is simply another process on your machine that has been isolated from all other processes on the host machine. That isolation leverages kernel namespaces and cgroups, features that have been in Linux for a long time. Docker has worked to make these capabilities approachable and easy to use.
If you’d like to see how containers are built from scratch, Liz Rice from Aqua Security has a fantastic talk in which she creates a container from scratch in Go. While she makes a simple container, this talk doesn’t go into networking, using images for the filesystem, and more. But, it gives a fantastic deep dive into how things are working.
What is a container image?
When running a container, it uses an isolated filesystem. This custom filesystem is provided by a container image. Since the image contains the container’s filesystem, it must contain everything needed to run an application - all dependencies, configuration, scripts, binaries, etc. The image also contains other configuration for the container, such as environment variables, a default command to run, and other metadata.
We’ll dive deeper into images later on, covering topics such as layering, best practices, and more.
If you’re familiar with
chroot, think of a container as an extended version ofchroot. The filesystem is simply coming from the image. But, a container adds additional isolation not available when simply using chroot.
Our Application
For the rest of this tutorial, we will be working with a simple todo list manager that is running in Node.js. If you’re not familiar with Node.js, don’t worry! No real JavaScript experience is needed!
At this point, your development team is quite small and you’re simply building an app to prove out your MVP (minimum viable product). You want to show how it works and what it’s capable of doing without needing to think about how it will work for a large team, multiple developers, etc.
Getting our App
Before we can run the application, we need to get the application source code onto our machine. For real projects, you will typically clone the repo. But, for this tutorial, we have created a ZIP file containing the application.
-
Download the ZIP. Open the ZIP file and make sure you extract the contents.
-
Once extracted, use your favorite code editor to open the project. If you’re in need of an editor, you can use Visual Studio Code. You should see the
package.jsonand two subdirectories (srcandspec).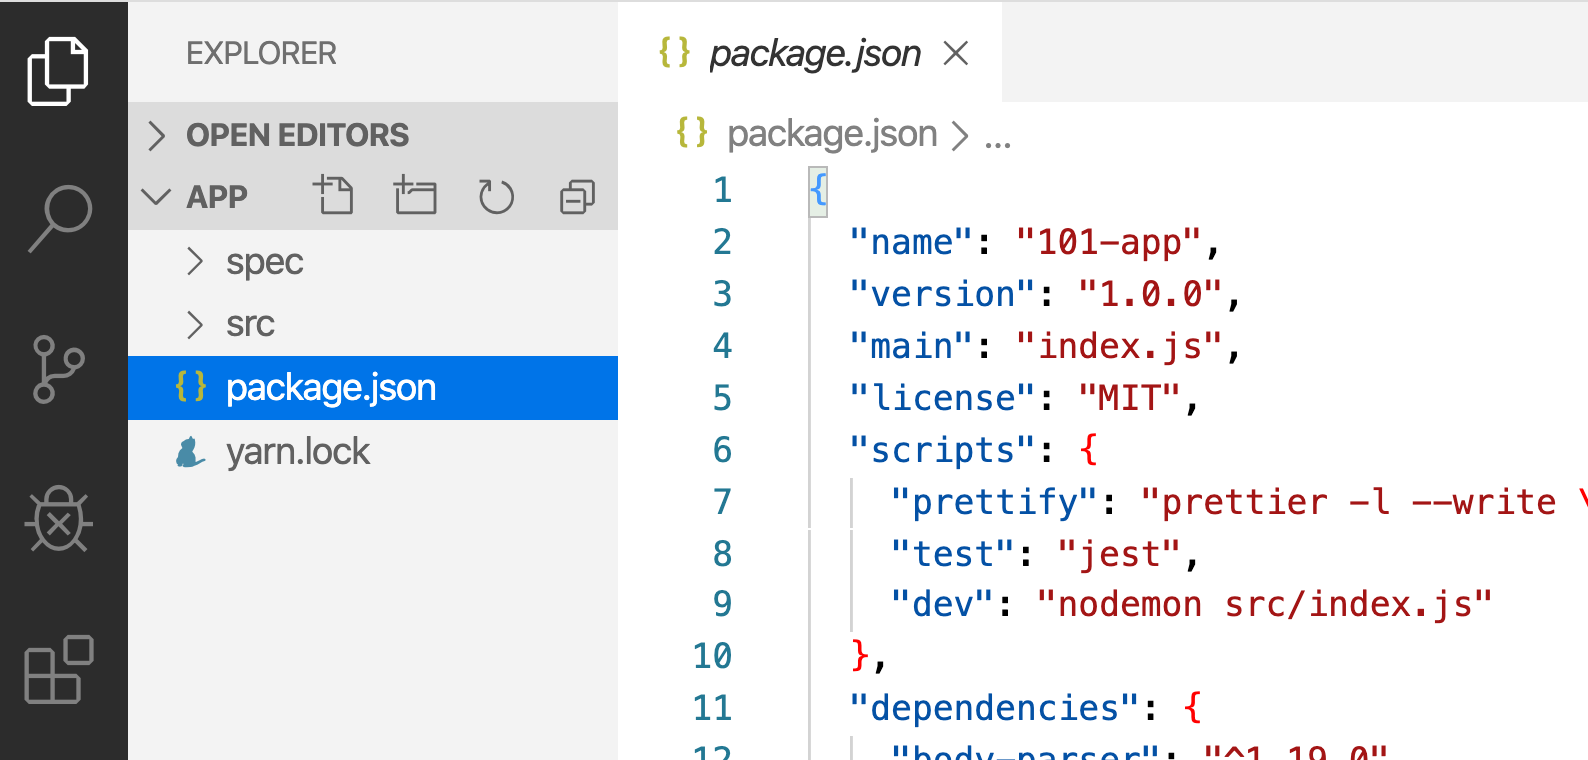
Building the App’s Container Image
In order to build the application, we need to use a Dockerfile. A Dockerfile is simply a text-based script of instructions that is used to create a container image. If you’ve created Dockerfiles before, you might see a few flaws in the Dockerfile below. But, don’t worry! We’ll go over them.
-
Create a file named
Dockerfilein the same folder as the filepackage.jsonwith the following contents.FROM node:12-alpine RUN apk add --no-cache python g++ make WORKDIR /app COPY . . RUN yarn install --production CMD ["node", "src/index.js"]Please check that the file
Dockerfilehas no file extension like.txt. Some editors may append this file extension automatically and this would result in an error in the next step. -
If you haven’t already done so, open a terminal and go to the
appdirectory with theDockerfile. Now build the container image using thedocker buildcommand.docker build -t getting-started .This command used the Dockerfile to build a new container image. You might have noticed that a lot of “layers” were downloaded. This is because we instructed the builder that we wanted to start from the
node:12-alpineimage. But, since we didn’t have that on our machine, that image needed to be downloaded.After the image was downloaded, we copied in our application and used
yarnto install our application’s dependencies. TheCMDdirective specifies the default command to run when starting a container from this image.
Finally, the -t flag tags our image. Think of this simply as a human-readable name for the final image. Since we named the image getting-started, we can refer to that image when we run a container.
The . at the end of the docker build command tells that Docker should look for the Dockerfile in the current directory.
Starting an App Container
Now that we have an image, let’s run the application! To do so, we will use the docker run command (remember that from earlier?).
-
Start your container using the
docker runcommand and specify the name of the image we just created:docker run -dp 3000:3000 getting-startedRemember the
-dand-pflags? We’re running the new container in “detached” mode (in the background) and creating a mapping between the host’s port 3000 to the container’s port 3000. Without the port mapping, we wouldn’t be able to access the application. -
After a few seconds, open your web browser to http://localhost:3000. You should see our app!

-
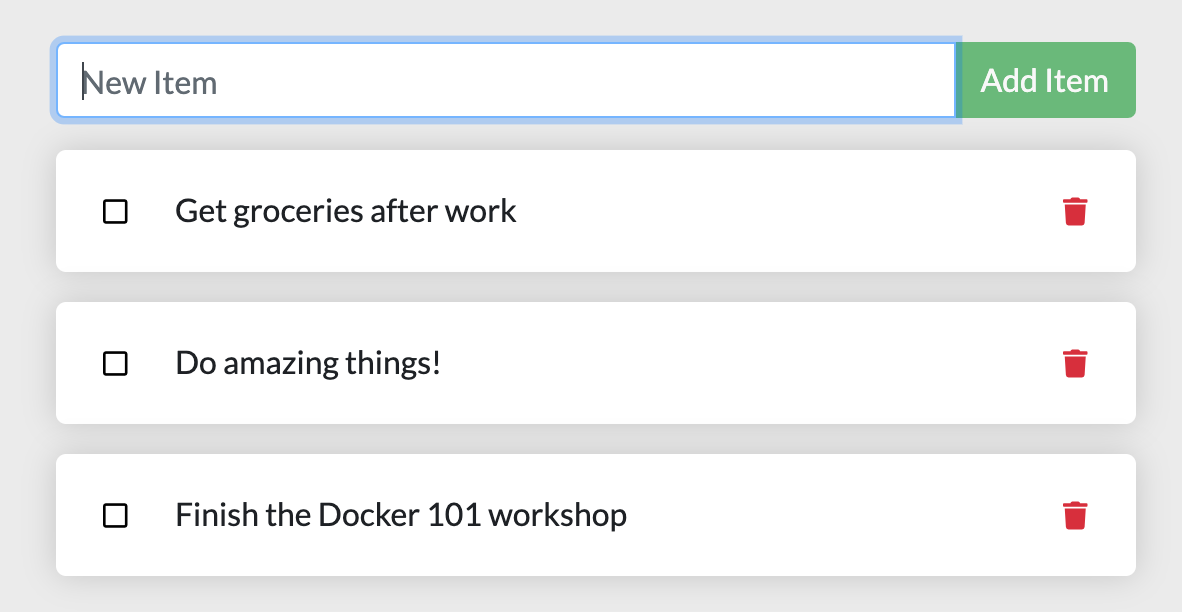
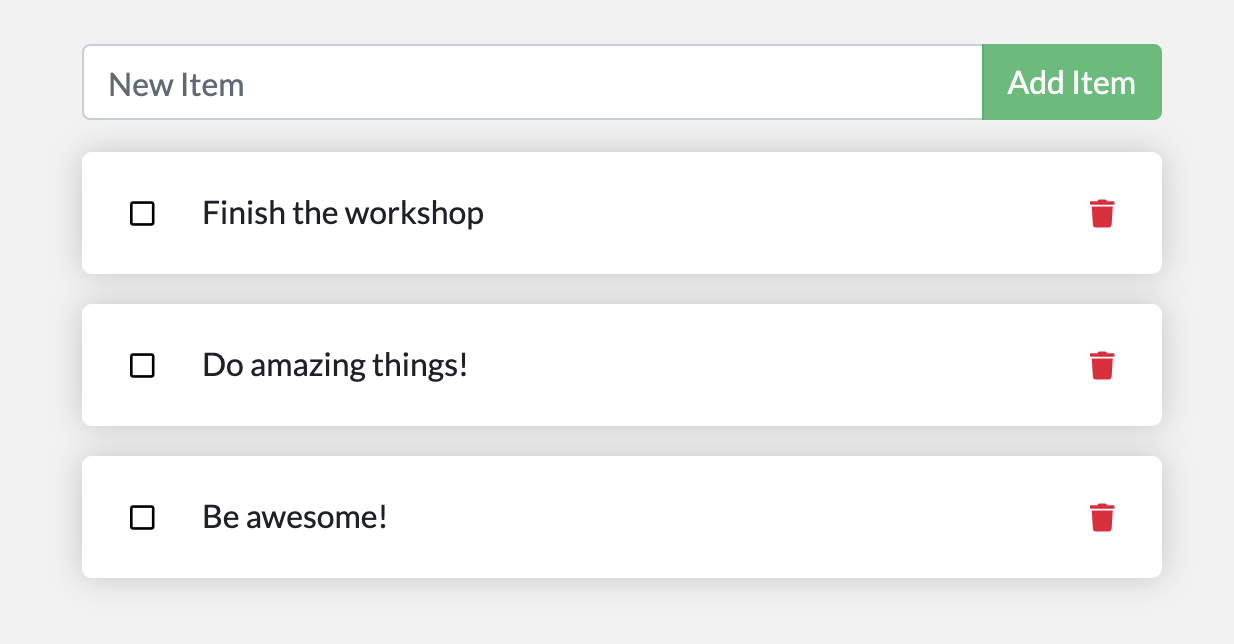
Go ahead and add an item or two and see that it works as you expect. You can mark items as complete and remove items. Your frontend is successfully storing items in the backend! Pretty quick and easy, huh?
At this point, you should have a running todo list manager with a few items, all built by you! Now, let’s make a few changes and learn about managing our containers.
If you take a quick look at the Docker Dashboard, you should see your two containers running now (this tutorial and your freshly launched app container)!

Recap
In this short section, we learned the very basics about building a container image and created a Dockerfile to do so. Once we built an image, we started the container and saw the running app!
Next, we’re going to make a modification to our app and learn how to update our running application with a new image. Along the way, we’ll learn a few other useful commands.
Updating our App
As a small feature request, we’ve been asked by the product team to change the “empty text” when we don’t have any todo list items. They would like to transition it to the following:
You have no todo items yet! Add one above!
Pretty simple, right? Let’s make the change.
Updating our Source Code
-
In the
src/static/js/app.jsfile, update line 56 to use the new empty text.- <p className="text-center">No items yet! Add one above!</p> + <p className="text-center">You have no todo items yet! Add one above!</p> -
Let’s build our updated version of the image, using the same command we used before.
docker build -t getting-started . -
Let’s start a new container using the updated code.
docker run -dp 3000:3000 getting-startedUh oh! You probably saw an error like this (the IDs will be different):
docker: Error response from daemon: driver failed programming external connectivity on endpoint laughing_burnell
(bb242b2ca4d67eba76e79474fb36bb5125708ebdabd7f45c8eaf16caaabde9dd): Bind for 0.0.0.0:3000 failed: port is already allocated.
So, what happened? We aren’t able to start the new container because our old container is still running. The reason this is a problem is because that container is using the host’s port 3000 and only one process on the machine (containers included) can listen to a specific port. To fix this, we need to remove the old container.
Replacing our Old Container
To remove a container, it first needs to be stopped. Once it has stopped, it can be removed. We have two ways that we can remove the old container. Feel free to choose the path that you’re most comfortable with.
Removing a container using the CLI
-
Get the ID of the container by using the
docker pscommand. Or you can usedocker ps -ato see all the container with closed.docker ps -
Use the
docker stopcommand to stop the container.# Swap out <the-container-id> with the ID from docker ps docker stop <the-container-id> -
Once the container has stopped, you can remove it by using the
docker rmcommand.docker rm <the-container-id>
You can stop and remove a container in a single command by adding the “force” flag to the
docker rmcommand. For example:docker rm -f <the-container-id>
Removing a container using the Docker Dashboard
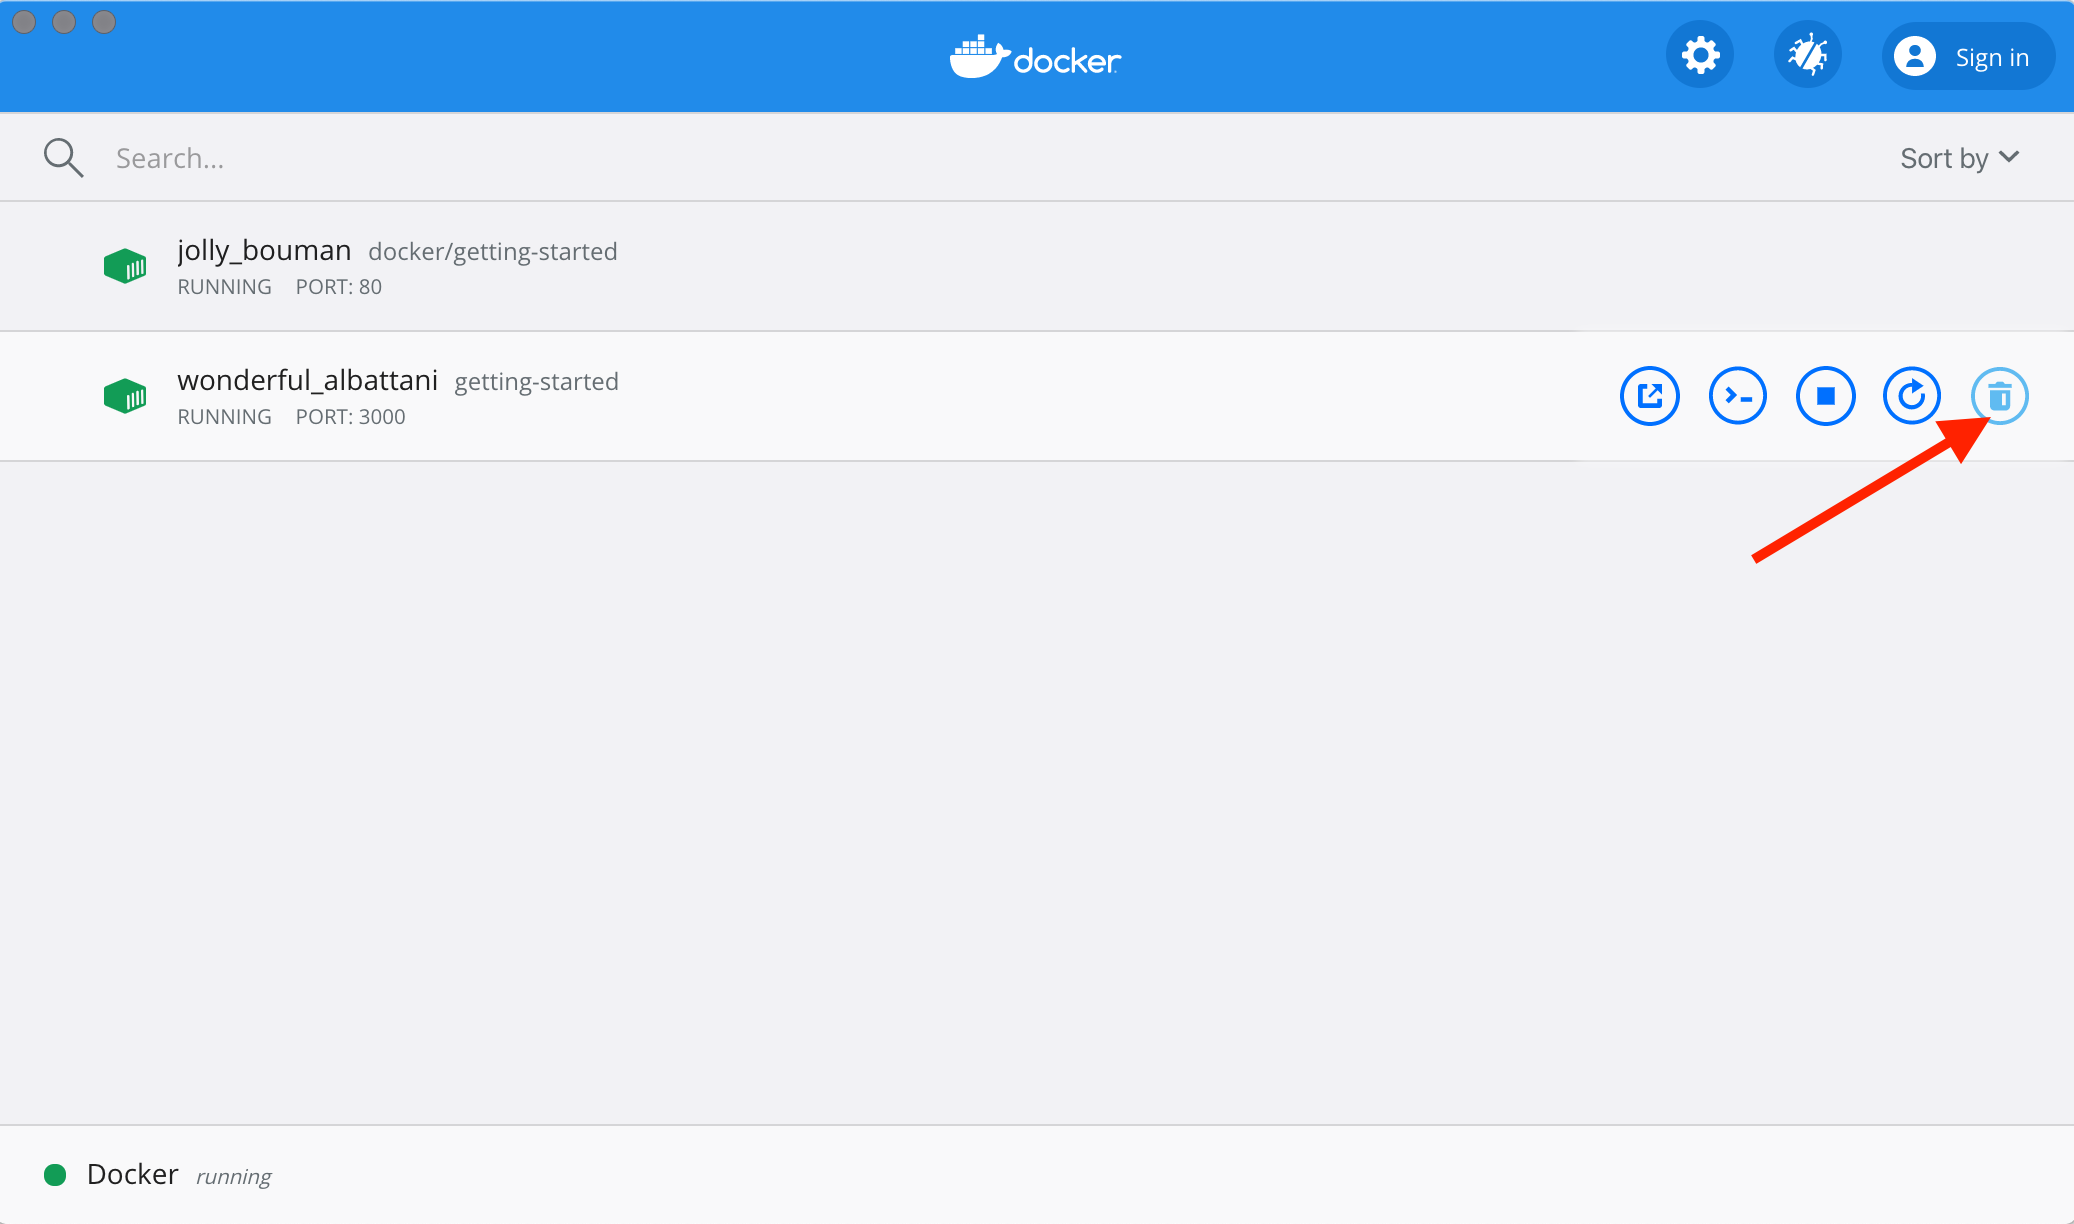
If you open the Docker dashboard, you can remove a container with two clicks! It’s certainly much easier than having to look up the container ID and remove it.
-
With the dashboard opened, hover over the app container and you’ll see a collection of action buttons appear on the right.
-
Click on the trash can icon to delete the container.
-
Confirm the removal and you’re done!
Starting our updated app container
-
Now, start your updated app.
docker run -dp 3000:3000 getting-started -
Refresh your browser on http://localhost:3000 and you should see your updated help text!

Recap-
While we were able to build an update, there were two things you might have noticed:
- All of the existing items in our todo list are gone! That’s not a very good app! We’ll talk about that shortly.
- There were a lot of steps involved for such a small change. In an upcoming section, we’ll talk about how to see code updates without needing to rebuild and start a new container every time we make a change.
Before talking about persistence, we’ll quickly see how to share these images with others.
Sharing our App
Now that we’ve built an image, let’s share it! To share Docker images, you have to use a Docker registry. The default registry is Docker Hub and is where all of the images we’ve used have come from.
Create a Repo
To push an image, we first need to create a repo on Docker Hub.
-
Go to Docker Hub and log in if you need to.
-
Click the Create Repository button.
-
For the repo name, use
getting-started. Make sure the Visibility isPublic. -
Click the Create button!
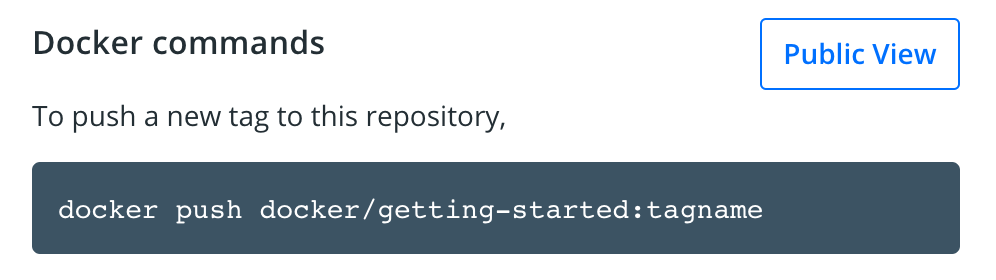
If you look on the right-side of the page, you’ll see a section named Docker commands. This gives an example command that you will need to run to push to this repo.
Pushing our Image
-
In the command line, try running the push command you see on Docker Hub. Note that your command will be using your namespace, not “docker”.
   $ docker push docker/getting-started
   The push refers to repository [docker.io/docker/getting-started]
   An image does not exist locally with the tag: docker/getting-started
Why did it fail? The push command was looking for an image named docker/getting-started, but didn’t find one. If you run
docker image ls, you won’t see one either.To fix this, we need to “tag” our existing image we’ve built to give it another name.
-
Login to the Docker Hub using the command
docker login -u YOUR-USER-NAME. -
Use the
docker tagcommand to give thegetting-startedimage a new name. Be sure to swap outYOUR-USER-NAMEwith your Docker ID.docker tag getting-started YOUR-USER-NAME/getting-started -
Now try your push command again. If you’re copying the value from Docker Hub, you can drop the
tagnameportion, as we didn’t add a tag to the image name. If you don’t specify a tag, Docker will use a tag calledlatest.docker push YOUR-USER-NAME/getting-started
Running our Image on a New Instance
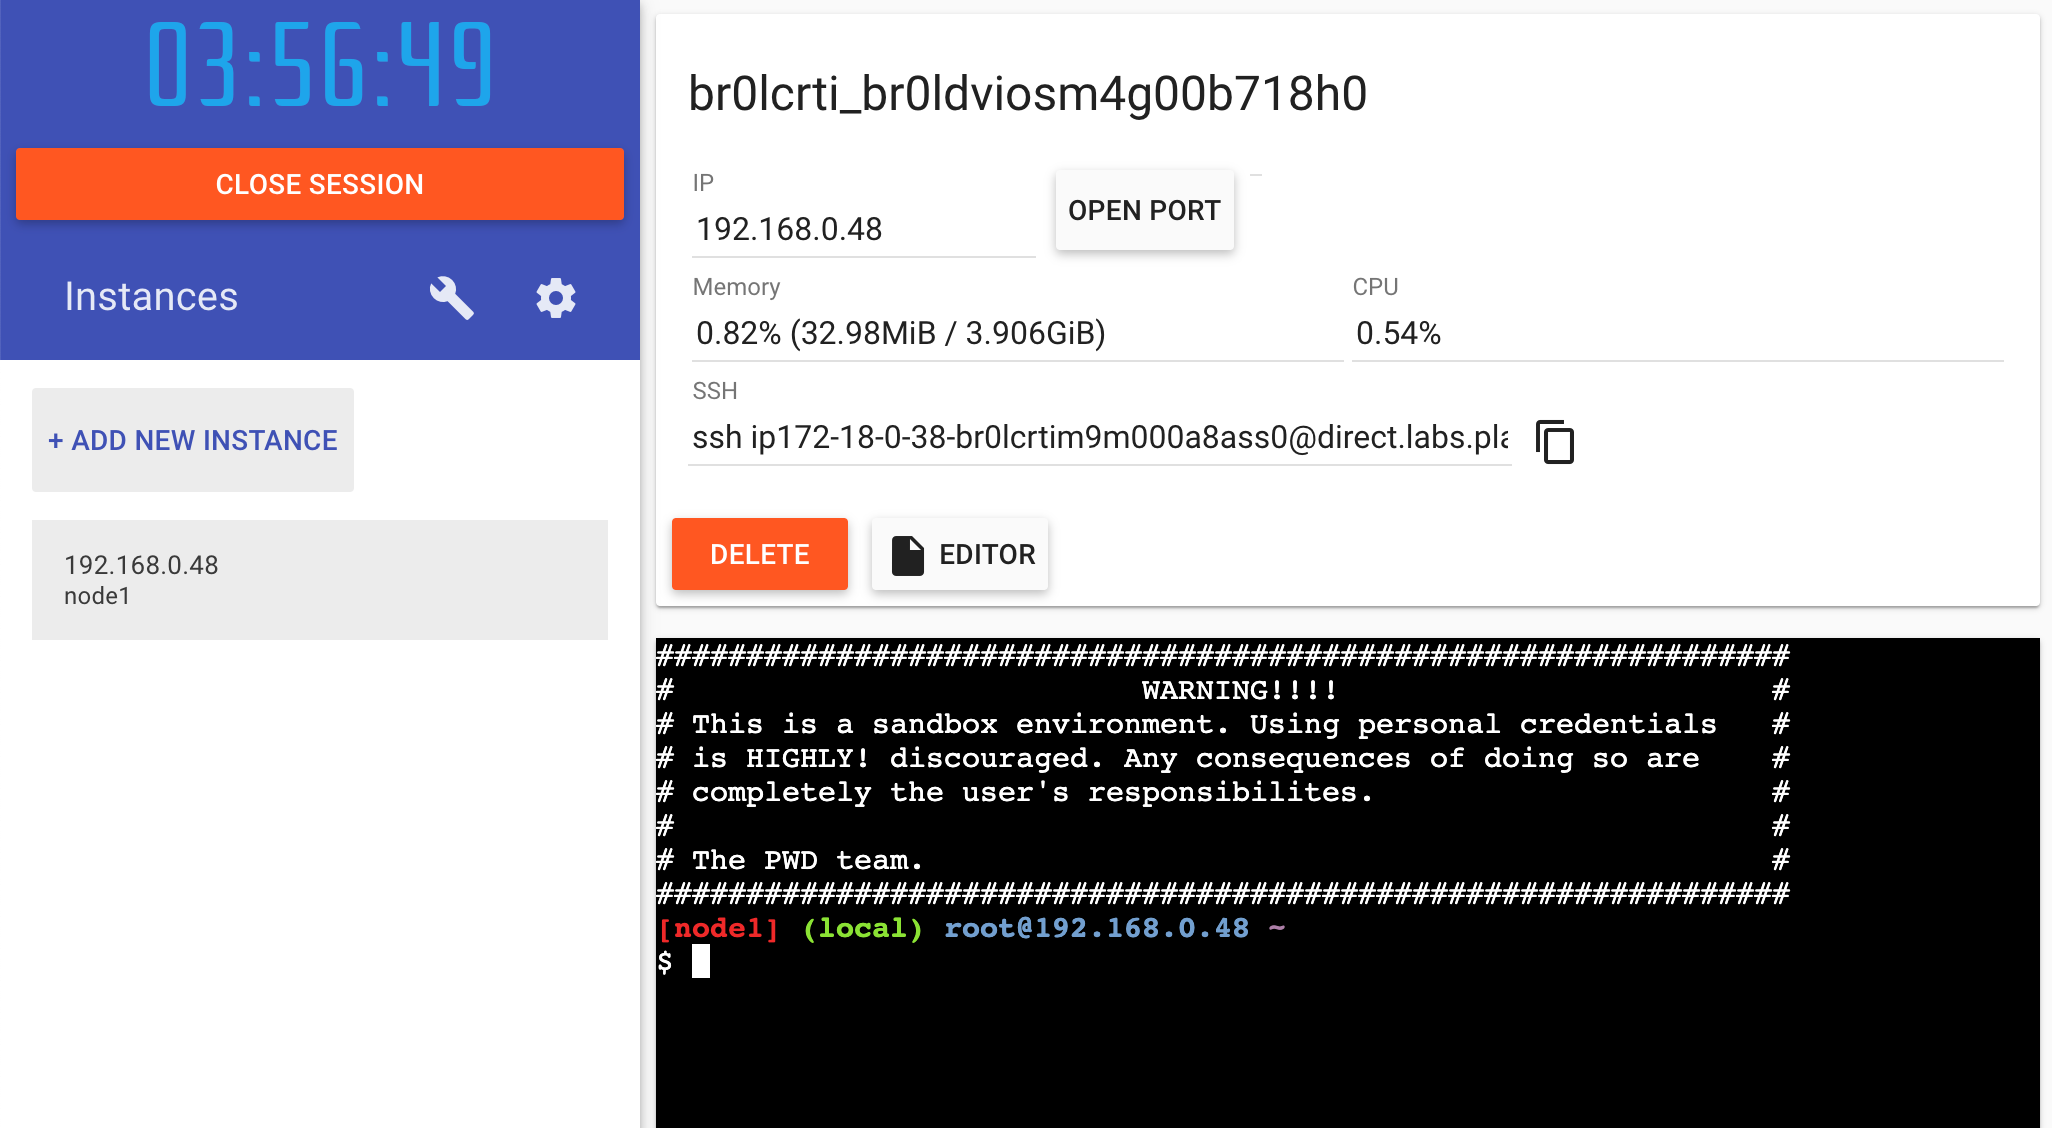
Now that our image has been built and pushed into a registry, let’s try running our app on a brand new instance that has never seen this container image! To do this, we will use Play with Docker.
-
Open your browser to Play with Docker.
-
Log in with your Docker Hub account.
-
Once you’re logged in, click on the “+ ADD NEW INSTANCE” link in the left side bar. (If you don’t see it, make your browser a little wider.) After a few seconds, a terminal window will be opened in your browser.
-
In the terminal, start your freshly pushed app.
docker run -dp 3000:3000 YOUR-USER-NAME/getting-startedYou should see the image get pulled down and eventually start up!
-
Click on the 3000 badge when it comes up and you should see the app with your modifications! Hooray! If the 3000 badge doesn’t show up, you can click on the “Open Port” button and type in 3000.
Recap–
In this section, we learned how to share our images by pushing them to a registry. We then went to a brand new instance and were able to run the freshly pushed image. This is quite common in CI pipelines, where the pipeline will create the image and push it to a registry and then the production environment can use the latest version of the image.
Now that we have that figured out, let’s circle back around to what we noticed at the end of the last section. As a reminder, we noticed that when we restarted the app, we lost all of our todo list items. That’s obviously not a great user experience, so let’s learn how we can persist the data across restarts!
Persisting our DB
In case you didn’t notice, our todo list is being wiped clean every single time we launch the container. Why is this? Let’s dive into how the container is working.
The Container’s Filesystem
When a container runs, it uses the various layers from an image for its filesystem. Each container also gets its own “scratch space” to create/update/remove files. Any changes won’t be seen in another container, even if they are using the same image.
Seeing this in Practice
To see this in action, we’re going to start two containers and create a file in each. What you’ll see is that the files created in one container aren’t available in another.
-
Start a
ubuntucontainer that will create a file named/data.txtwith a random number between 1 and 10000.docker run -d ubuntu bash -c "shuf -i 1-10000 -n 1 -o /data.txt && tail -f /dev/null"In case you’re curious about the command, we’re starting a bash shell and invoking two commands (why we have the
&&). The first portion picks a single random number and writes it to/data.txt. The second command is simply watching a file to keep the container running. -
Validate we can see the output by
exec‘ing into the container. To do so, open the Dashboard and click the first action of the container that is running theubuntuimage.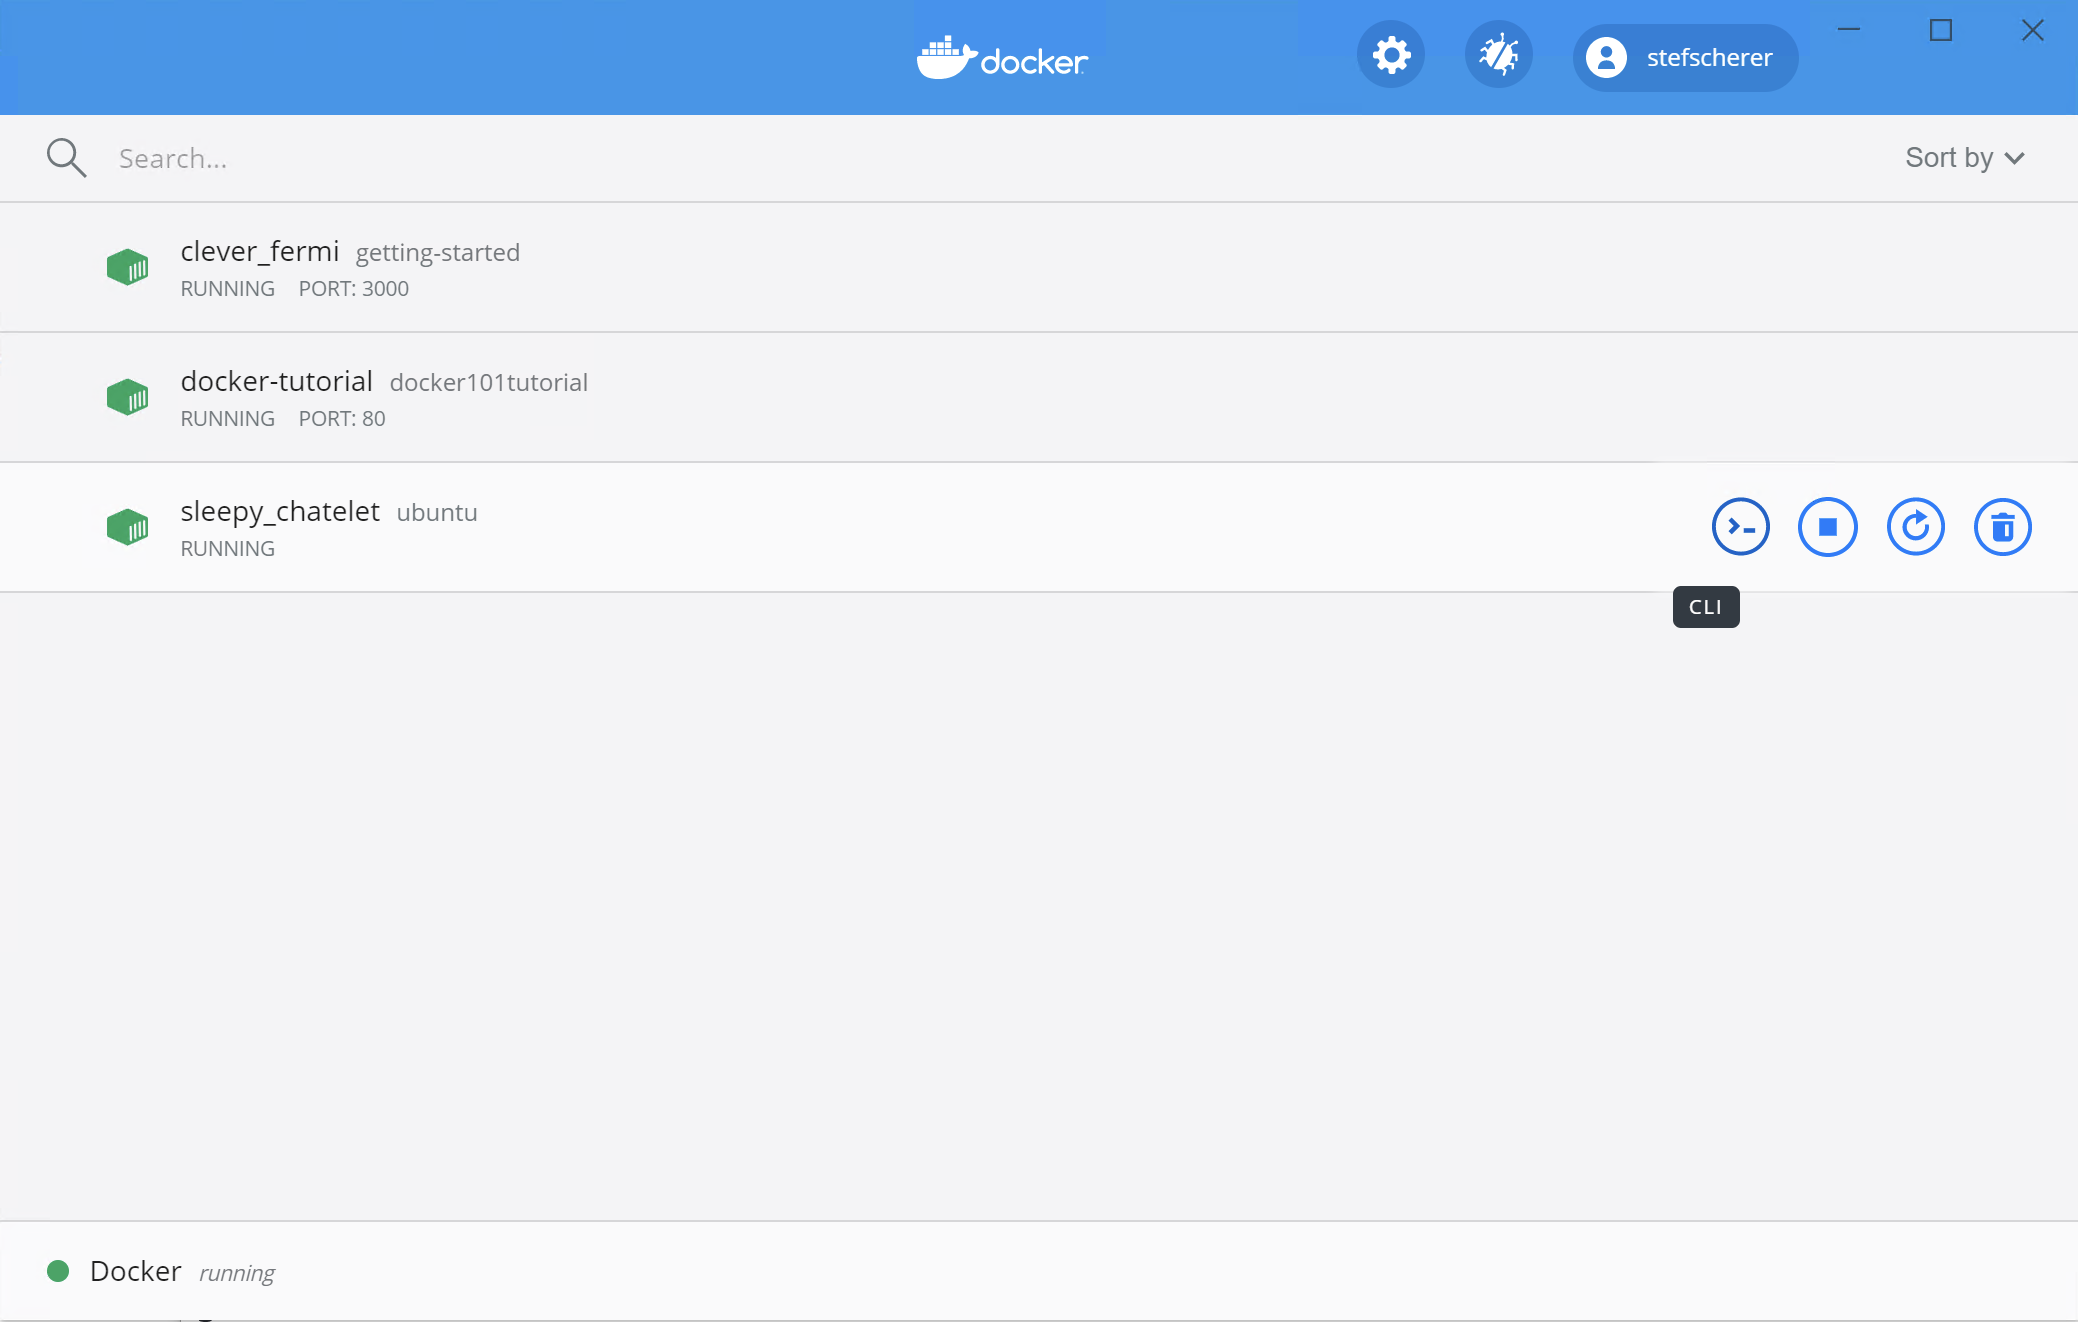
You will see a terminal that is running a shell in the ubuntu container. Run the following command to see the content of the
/data.txtfile. Close this terminal afterwards again.cat /data.txtIf you prefer the command line you can use the
docker execcommand to do the same. You need to get the container’s ID (usedocker psto get it) and get the content with the following command.docker exec <container-id> cat /data.txtYou should see a random number!
-
Now, let’s start another
ubuntucontainer (the same image) and we’ll see we don’t have the same file.docker run -it ubuntu ls /And look! There’s no
data.txtfile there! That’s because it was written to the scratch space for only the first container. -
Go ahead and remove the first container using the
docker rm -fcommand.
Container Volumes
With the previous experiment, we saw that each container starts from the image definition each time it starts. While containers can create, update, and delete files, those changes are lost when the container is removed and all changes are isolated to that container. With volumes, we can change all of this.
Volumes provide the ability to connect specific filesystem paths of the container back to the host machine. If a directory in the container is mounted, changes in that directory are also seen on the host machine. If we mount that same directory across container restarts, we’d see the same files.
There are two main types of volumes. We will eventually use both, but we will start with named volumes.
Persisting our Todo Data
By default, the todo app stores its data in a SQLite Database at /etc/todos/todo.db. If you’re not familiar with SQLite, no worries! It’s simply a relational database in which all of the data is stored in a single file. While this isn’t the best for large-scale applications, it works for small demos. We’ll talk about switching this to a different database engine later.
With the database being a single file, if we can persist that file on the host and make it available to the next container, it should be able to pick up where the last one left off. By creating a volume and attaching (often called “mounting”) it to the directory the data is stored in, we can persist the data. As our container writes to the todo.db file, it will be persisted to the host in the volume.
As mentioned, we are going to use a named volume. Think of a named volume as simply a bucket of data. Docker maintains the physical location on the disk and you only need to remember the name of the volume. Every time you use the volume, Docker will make sure the correct data is provided.
-
Create a volume by using the
docker volume createcommand.docker volume create todo-db -
Stop the todo app container once again in the Dashboard (or with
docker rm -f <id>), as it is still running without using the persistent volume. -
Start the todo app container, but add the
-vflag to specify a volume mount. We will use the named volume and mount it to/etc/todos, which will capture all files created at the path.docker run -dp 3000:3000 -v todo-db:/etc/todos getting-started -
Once the container starts up, open the app and add a few items to your todo list.
-
Remove the container for the todo app. Use the Dashboard or
docker psto get the ID and thendocker rm -f <id>to remove it. -
Start a new container using the same command from above.
-
Open the app. You should see your items still in your list!
-
Go ahead and remove the container when you’re done checking out your list.
Hooray! You’ve now learned how to persist data!
While named volumes and bind mounts (which we’ll talk about in a minute) are the two main types of volumes supported by a default Docker engine installation, there are many volume driver plugins available to support NFS, SFTP, NetApp, and more! This will be especially important once you start running containers on multiple hosts in a clustered environment with Swarm, Kubernetes, etc.
Diving into our Volume
A lot of people frequently ask “Where is Docker actually storing my data when I use a named volume?” If you want to know, you can use the docker volume inspect command.
docker volume inspect todo-db
[
    {
        "CreatedAt": "2019-09-26T02:18:36Z",
        "Driver": "local",
        "Labels": {},
        "Mountpoint": "/var/lib/docker/volumes/todo-db/_data",
        "Name": "todo-db",
        "Options": {},
        "Scope": "local"
    }
]
The Mountpoint is the actual location on the disk where the data is stored. Note that on most machines, you will need to have root access to access this directory from the host. But, that’s where it is!
While running in Docker Desktop, the Docker commands are actually running inside a small VM on your machine. If you wanted to look at the actual contents of the Mountpoint directory, you would need to first get inside of the VM.
Recap+
At this point, we have a functioning application that can survive restarts! We can show it off to our investors and hope they can catch our vision!
However, we saw earlier that rebuilding images for every change takes quite a bit of time. There’s got to be a better way to make changes, right? With bind mounts (which we hinted at earlier), there is a better way! Let’s take a look at that now!
Using Bind Mounts
In the previous chapter, we talked about and used a named volume to persist the data in our database. Named volumes are great if we simply want to store data, as we don’t have to worry about where the data is stored.
With bind mounts, we control the exact mountpoint on the host. We can use this to persist data, but is often used to provide additional data into containers. When working on an application, we can use a bind mount to mount our source code into the container to let it see code changes, respond, and let us see the changes right away.
For Node-based applications, nodemon is a great tool to watch for file changes and then restart the application. There are equivalent tools in most other languages and frameworks.
Quick Volume Type Comparisons
Bind mounts and named volumes are the two main types of volumes that come with the Docker engine. However, additional volume drivers are available to support other use cases (SFTP, Ceph, NetApp, S3, and more).
| Named Volumes | Bind Mounts | |
|---|---|---|
| Host Location | Docker chooses | You control |
Mount Example (using -v) |
my-volume:/usr/local/data | /path/to/data:/usr/local/data |
| Populates new volume with container contents | Yes | No |
| Supports Volume Drivers | Yes | No |
Starting a Dev-Mode Container
To run our container to support a development workflow, we will do the following:
- Mount our source code into the container
- Install all dependencies, including the “dev” dependencies
- Start nodemon to watch for filesystem changes
So, let’s do it!
-
Make sure you don’t have any previous
getting-startedcontainers running. -
Run the following command. We’ll explain what’s going on afterwards:
docker run -dp 3000:3000 \
    -w /app -v "$(pwd):/app" \
    node:12-alpine \
    sh -c "yarn install && yarn run dev"
If you are using PowerShell then use this command.
docker run -dp 3000:3000 `
    -w /app -v "$(pwd):/app" `
    node:12-alpine `
    sh -c "yarn install && yarn run dev"
-dp 3000:3000- same as before. Run in detached (background) mode and create a port mapping-w /app- sets the “working directory” or the current directory that the command will run from-v "$(pwd):/app"- bind mount the current directory from the host in the container into the/appdirectorynode:12-alpine- the image to use. Note that this is the base image for our app from the Dockerfilesh -c "yarn install && yarn run dev"- the command. We’re starting a shell usingsh(alpine doesn’t havebash) and runningyarn installto install all dependencies and then runningyarn run dev. If we look in thepackage.json, we’ll see that thedevscript is startingnodemon.
-
You can watch the logs using
docker logs -f <container-id>. You’ll know you’re ready to go when you see this…docker logs -f <container-id> $ nodemon src/index.js [nodemon] 1.19.2 [nodemon] to restart at any time, enter `rs` [nodemon] watching dir(s): *.* [nodemon] starting `node src/index.js` Using sqlite database at /etc/todos/todo.db Listening on port 3000When you’re done watching the logs, exit out by hitting
Ctrl+C. -
Now, let’s make a change to the app. In the
src/static/js/app.jsfile, let’s change the “Add Item” button to simply say “Add”. This change will be on line 109.- {submitting ? 'Adding...' : 'Add Item'} + {submitting ? 'Adding...' : 'Add'} -
Simply refresh the page (or open it) and you should see the change reflected in the browser almost immediately. It might take a few seconds for the Node server to restart, so if you get an error, just try refreshing after a few seconds.

-
Feel free to make any other changes you’d like to make. When you’re done, stop the container and build your new image using
docker build -t getting-started ..
Using bind mounts is very common for local development setups. The advantage is that the dev machine doesn’t need to have all of the build tools and environments installed. With a single docker run command, the dev environment is pulled and ready to go. We’ll talk about Docker Compose in a future step, as this will help simplify our commands (we’re already getting a lot of flags).
Recap=
At this point, we can persist our database and respond rapidly to the needs and demands of our investors and founders. Hooray! But, guess what? We received great news!
Your project has been selected for future development!
In order to prepare for production, we need to migrate our database from working in SQLite to something that can scale a little better. For simplicity, we’ll keep with a relational database and switch our application to use MySQL. But, how should we run MySQL? How do we allow the containers to talk to each other? We’ll talk about that next!
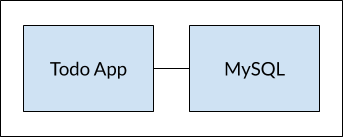
Multi-Container Apps
Up to this point, we have been working with single container apps. But, we now want to add MySQL to the application stack. The following question often arises - “Where will MySQL run? Install it in the same container or run it separately?” In general, each container should do one thing and do it well. A few reasons:
- There’s a good chance you’d have to scale APIs and front-ends differently than databases
- Separate containers let you version and update versions in isolation
- While you may use a container for the database locally, you may want to use a managed service for the database in production. You don’t want to ship your database engine with your app then.
- Running multiple processes will require a process manager (the container only starts one process), which adds complexity to container startup/shutdown
And there are more reasons. So, we will update our application to work like this:
Container Networking
Remember that containers, by default, run in isolation and don’t know anything about other processes or containers on the same machine. So, how do we allow one container to talk to another? The answer is networking. Now, you don’t have to be a network engineer (hooray!). Simply remember this rule…
If two containers are on the same network, they can talk to each other. If they aren’t, they can’t.
Starting MySQL
There are two ways to put a container on a network: 1) Assign it at start or 2) connect an existing container. For now, we will create the network first and attach the MySQL container at startup.
-
Create the network.
docker network create todo-app -
Start a MySQL container and attach it to the network. We’re also going to define a few environment variables that the database will use to initialize the database (see the “Environment Variables” section in the MySQL Docker Hub listing).
   docker run -d \
      --network todo-app --network-alias mysql \
      -v todo-mysql-data:/var/lib/mysql \
      -e MYSQL_ROOT_PASSWORD=secret \
      -e MYSQL_DATABASE=todos \
      mysql:5.7
If you are using PowerShell then use this command.
   docker run -d `
      --network todo-app --network-alias mysql `
      -v todo-mysql-data:/var/lib/mysql `
      -e MYSQL_ROOT_PASSWORD=secret `
      -e MYSQL_DATABASE=todos `
      mysql:5.7
You’ll also see we specified the
--network-aliasflag. We’ll come back to that in just a moment.You’ll notice we’re using a volume named
todo-mysql-datahere and mounting it at/var/lib/mysql, which is where MySQL stores its data. However, we never ran adocker volume createcommand. Docker recognizes we want to use a named volume and creates one automatically for us. -
To confirm we have the database up and running, connect to the database and verify it connects.
docker exec -it <mysql-container-id> mysql -pWhen the password prompt comes up, type in secret. In the MySQL shell, list the databases and verify you see the
todosdatabase.mysql> SHOW DATABASES;You should see output that looks like this:
   +--------------------+
   | Database           |
   +--------------------+
   | information_schema |
   | mysql              |
   | performance_schema |
   | sys                |
   | todos              |
   +--------------------+
   5 rows in set (0.00 sec)
Hooray! We have our todos database and it’s ready for us to use!
Connecting to MySQL
Now that we know MySQL is up and running, let’s use it! But, the question is… how? If we run another container on the same network, how do we find the container (remember each container has its own IP address)?
To figure it out, we’re going to make use of the nicolaka/netshoot container, which ships with a lot of tools that are useful for troubleshooting or debugging networking issues.
-
Start a new container using the nicolaka/netshoot image. Make sure to connect it to the same network.
docker run -it --network todo-app nicolaka/netshoot -
Inside the container, we’re going to use the
digcommand, which is a useful DNS tool. We’re going to look up the IP address for the hostnamemysql.dig mysqlAnd you’ll get an output like this…
   ; <<>> DiG 9.14.1 <<>> mysql
   ;; global options: +cmd
   ;; Got answer:
   ;; ->>HEADER<<- opcode: QUERY, status: NOERROR, id: 32162
   ;; flags: qr rd ra; QUERY: 1, ANSWER: 1, AUTHORITY: 0, ADDITIONAL: 0

;; QUESTION SECTION:
   ;mysql.    IN A

;; ANSWER SECTION:
   mysql.   600 IN A 172.23.0.2

;; Query time: 0 msec
   ;; SERVER: 127.0.0.11#53(127.0.0.11)
   ;; WHEN: Tue Oct 01 23:47:24 UTC 2019
   ;; MSG SIZE  rcvd: 44
In the “ANSWER SECTION”, you will see an
Arecord formysqlthat resolves to172.23.0.2(your IP address will most likely have a different value). Whilemysqlisn’t normally a valid hostname, Docker was able to resolve it to the IP address of the container that had that network alias (remember the--network-aliasflag we used earlier?).What this means is… our app only simply needs to connect to a host named
mysqland it’ll talk to the database! It doesn’t get much simpler than that!
Running our App with MySQL
The todo app supports the setting of a few environment variables to specify MySQL connection settings. They are:
MYSQL_HOST- the hostname for the running MySQL serverMYSQL_USER- the username to use for the connectionMYSQL_PASSWORD- the password to use for the connectionMYSQL_DB- the database to use once connected
While using env vars to set connection settings is generally ok for development, it is HIGHLY DISCOURAGED when running applications in production. Diogo Monica, the former lead of security at Docker, wrote a fantastic blog post explaining why.
A more secure mechanism is to use the secret support provided by your container orchestration framework. In most cases, these secrets are mounted as files in the running container. You’ll see many apps (including the MySQL image and the todo app) also support env vars with a
_FILEsuffix to point to a file containing the variable.As an example, setting the
MYSQL_PASSWORD_FILEvar will cause the app to use the contents of the referenced file as the connection password. Docker doesn’t do anything to support these env vars. Your app will need to know to look for the variable and get the file contents.
With all of that explained, let’s start our dev-ready container!
-
We’ll specify each of the environment variables above, as well as connect the container to our app network.
docker run -dp 3000:3000 \
  -w /app -v "$(pwd):/app" \
  --network todo-app \
  -e MYSQL_HOST=mysql \
  -e MYSQL_USER=root \
  -e MYSQL_PASSWORD=secret \
  -e MYSQL_DB=todos \
  node:12-alpine \
  sh -c "yarn install && yarn run dev"
If you are using PowerShell then use this command.
docker run -dp 3000:3000 ` -w /app -v "$(pwd):/app" ` --network todo-app ` -e MYSQL_HOST=mysql ` -e MYSQL_USER=root ` -e MYSQL_PASSWORD=secret ` -e MYSQL_DB=todos ` node:12-alpine ` sh -c "yarn install && yarn run dev" -
If we look at the logs for the container (
docker logs <container-id>), we should see a message indicating it’s using the mysql database.# Previous log messages omitted $ nodemon src/index.js [nodemon] 1.19.2 [nodemon] to restart at any time, enter `rs` [nodemon] watching dir(s): *.* [nodemon] starting `node src/index.js` Connected to mysql db at host mysql Listening on port 3000 -
Open the app in your browser and add a few items to your todo list.
-
Connect to the mysql database and prove that the items are being written to the database. Remember, the password is secret.
docker exec -it <mysql-container-id> mysql -p todosAnd in the mysql shell, run the following:
mysql> select * from todo_items;
+--------------------------------------+--------------------+-----------+
| id                                   | name               | completed |
+--------------------------------------+--------------------+-----------+
| c906ff08-60e6-44e6-8f49-ed56a0853e85 | Do amazing things! |         0 |
| 2912a79e-8486-4bc3-a4c5-460793a575ab | Be awesome!        |         0 |
+--------------------------------------+--------------------+-----------+
Obviously, your table will look different because it has your items. But, you should see them stored there!
If you take a quick look at the Docker Dashboard, you’ll see that we have two app containers running. But, there’s no real indication that they are grouped together in a single app. We’ll see how to make that better shortly!
Recap_
At this point, we have an application that now stores its data in an external database running in a separate container. We learned a little bit about container networking and saw how service discovery can be performed using DNS.
But, there’s a good chance you are starting to feel a little overwhelmed with everything you need to do to start up this application. We have to create a network, start containers, specify all of the environment variables, expose ports, and more! That’s a lot to remember and it’s certainly making things harder to pass along to someone else.
In the next section, we’ll talk about Docker Compose. With Docker Compose, we can share our application stacks in a much easier way and let others spin them up with a single (and simple) command!
Using Docker Compose
Docker Compose is a tool that was developed to help define and share multi-container applications. With Compose, we can create a YAML file to define the services and with a single command, can spin everything up or tear it all down.
The big advantage of using Compose is you can define your application stack in a file, keep it at the root of your project repo (it’s now version controlled), and easily enable someone else to contribute to your project. Someone would only need to clone your repo and start the compose app. In fact, you might see quite a few projects on GitHub/GitLab doing exactly this now.
So, how do we get started?
Installing Docker Compose
If you installed Docker Desktop/Toolbox for either Windows or Mac, you already have Docker Compose! Play-with-Docker instances already have Docker Compose installed as well. If you are on a Linux machine, you will need to install Docker Compose using the instructions here.
After installation, you should be able to run the following and see version information.
docker-compose version
Creating our Compose File
-
At the root of the app project, create a file named
docker-compose.yml. -
In the compose file, we’ll start off by defining the schema version. In most cases, it’s best to use the latest supported version. You can look at the Compose file reference for the current schema versions and the compatibility matrix.
version: '3.7' -
Next, we’ll define the list of services (or containers) we want to run as part of our application.
version: '3.7'

services:
And now, we’ll start migrating a service at a time into the compose file.
Defining the App Service
To remember, this was the command we were using to define our app container.
docker run -dp 3000:3000 \
-w /app -v "$(pwd):/app" \
--network todo-app \
-e MYSQL_HOST=mysql \
-e MYSQL_USER=root \
-e MYSQL_PASSWORD=secret \
-e MYSQL_DB=todos \
node:12-alpine \
sh -c "yarn install && yarn run dev"
If you are using PowerShell then use this command.
docker run -dp 3000:3000 `
-w /app -v "$(pwd):/app" `
--network todo-app `
-e MYSQL_HOST=mysql `
-e MYSQL_USER=root `
-e MYSQL_PASSWORD=secret `
-e MYSQL_DB=todos `
node:12-alpine `
sh -c "yarn install && yarn run dev"
-
First, let’s define the service entry and the image for the container. We can pick any name for the service. The name will automatically become a network alias, which will be useful when defining our MySQL service.
version: '3.7' services: app: image: node:12-alpine -
Typically, you will see the command close to the
imagedefinition, although there is no requirement on ordering. So, let’s go ahead and move that into our file.version: '3.7' services: app: image: node:12-alpine command: sh -c "yarn install && yarn run dev" -
Let’s migrate the
-p 3000:3000part of the command by defining theportsfor the service. We will use the short syntax here, but there is also a more verbose long syntax available as well.version: '3.7' services: app: image: node:12-alpine command: sh -c "yarn install && yarn run dev" ports: - 3000:3000 -
Next, we’ll migrate both the working directory (
-w /app) and the volume mapping (-v "$(pwd):/app") by using theworking_dirandvolumesdefinitions. Volumes also has a short and long syntax.One advantage of Docker Compose volume definitions is we can use relative paths from the current directory.
version: '3.7' services: app: image: node:12-alpine command: sh -c "yarn install && yarn run dev" ports: - 3000:3000 working_dir: /app volumes: - ./:/app -
Finally, we need to migrate the environment variable definitions using the
environmentkey.version: '3.7' services: app: image: node:12-alpine command: sh -c "yarn install && yarn run dev" ports: - 3000:3000 working_dir: /app volumes: - ./:/app environment: MYSQL_HOST: mysql MYSQL_USER: root MYSQL_PASSWORD: secret MYSQL_DB: todos
Defining the MySQL Service
Now, it’s time to define the MySQL service. The command that we used for that container was the following:
docker run -d \
--network todo-app --network-alias mysql \
-v todo-mysql-data:/var/lib/mysql \
-e MYSQL_ROOT_PASSWORD=secret \
-e MYSQL_DATABASE=todos \
mysql:5.7
If you are using PowerShell then use this command.
docker run -d `
--network todo-app --network-alias mysql `
-v todo-mysql-data:/var/lib/mysql `
-e MYSQL_ROOT_PASSWORD=secret `
-e MYSQL_DATABASE=todos `
mysql:5.7
-
We will first define the new service and name it
mysqlso it automatically gets the network alias. We’ll go ahead and specify the image to use as well.version: '3.7' services: app: # The app service definition mysql: image: mysql:5.7 -
Next, we’ll define the volume mapping. When we ran the container with
docker run, the named volume was created automatically. However, that doesn’t happen when running with Compose. We need to define the volume in the top-levelvolumes:section and then specify the mountpoint in the service config. By simply providing only the volume name, the default options are used. There are many more options available though.version: '3.7' services: app: # The app service definition mysql: image: mysql:5.7 volumes: - todo-mysql-data:/var/lib/mysql volumes: todo-mysql-data: -
Finally, we only need to specify the environment variables.
version: '3.7' services: app: # The app service definition mysql: image: mysql:5.7 volumes: - todo-mysql-data:/var/lib/mysql environment: MYSQL_ROOT_PASSWORD: secret MYSQL_DATABASE: todos volumes: todo-mysql-data:
At this point, our complete docker-compose.yml should look like this:
version: '3.7'

services:
  app:
    image: node:12-alpine
    command: sh -c "yarn install && yarn run dev"
    ports:
      - 3000:3000
working_dir: /app
volumes:
- ./:/app
environment:
MYSQL_HOST: mysql
MYSQL_USER: root
MYSQL_PASSWORD: secret
MYSQL_DB: todos
mysql:
image: mysql:5.7
volumes:
- todo-mysql-data:/var/lib/mysql
environment:
MYSQL_ROOT_PASSWORD: secret
MYSQL_DATABASE: todos
volumes:
todo-mysql-data:
Running our Application Stack
Now that we have our docker-compose.yml file, we can start it up!
-
Make sure no other copies of the app/db are running first (
docker psanddocker rm -f <ids>). -
Start up the application stack using the
docker-compose upcommand. We’ll add the-dflag to run everything in the background.docker-compose up -dWhen we run this, we should see output like this:
Creating network "app_default" with the default driver
Creating volume "app_todo-mysql-data" with default driver
Creating app_app_1   ... done
Creating app_mysql_1 ... done
You’ll notice that the volume was created as well as a network! By default, Docker Compose automatically creates a network specifically for the application stack (which is why we didn’t define one in the compose file).
-
Let’s look at the logs using the
docker-compose logs -fcommand. You’ll see the logs from each of the services interleaved into a single stream. This is incredibly useful when you want to watch for timing-related issues. The-fflag “follows” the log, so will give you live output as it’s generated.If you don’t already, you’ll see output that looks like this…
mysql_1  | 2019-10-03T03:07:16.083639Z 0 [Note] mysqld: ready for connections.
mysql_1  | Version: '5.7.27'  socket: '/var/run/mysqld/mysqld.sock'  port: 3306  MySQL Community Server (GPL)
app_1    | Connected to mysql db at host mysql
app_1    | Listening on port 3000
The service name is displayed at the beginning of the line (often colored) to help distinguish messages. If you want to view the logs for a specific service, you can add the service name to the end of the logs command (for example,
docker-compose logs -f app).When the app is starting up, it actually sits and waits for MySQL to be up and ready before trying to connect to it. Docker doesn’t have any built-in support to wait for another container to be fully up, running, and ready before starting another container. For Node-based projects, you can use the wait-port dependency. Similar projects exist for other languages/frameworks.
-
At this point, you should be able to open your app and see it running. And hey! We’re down to a single command!
Seeing our App Stack in Docker Dashboard
If we look at the Docker Dashboard, we’ll see that there is a group named app. This is the “project name” from Docker Compose and used to group the containers together. By default, the project name is simply the name of the directory that the docker-compose.yml was located in.
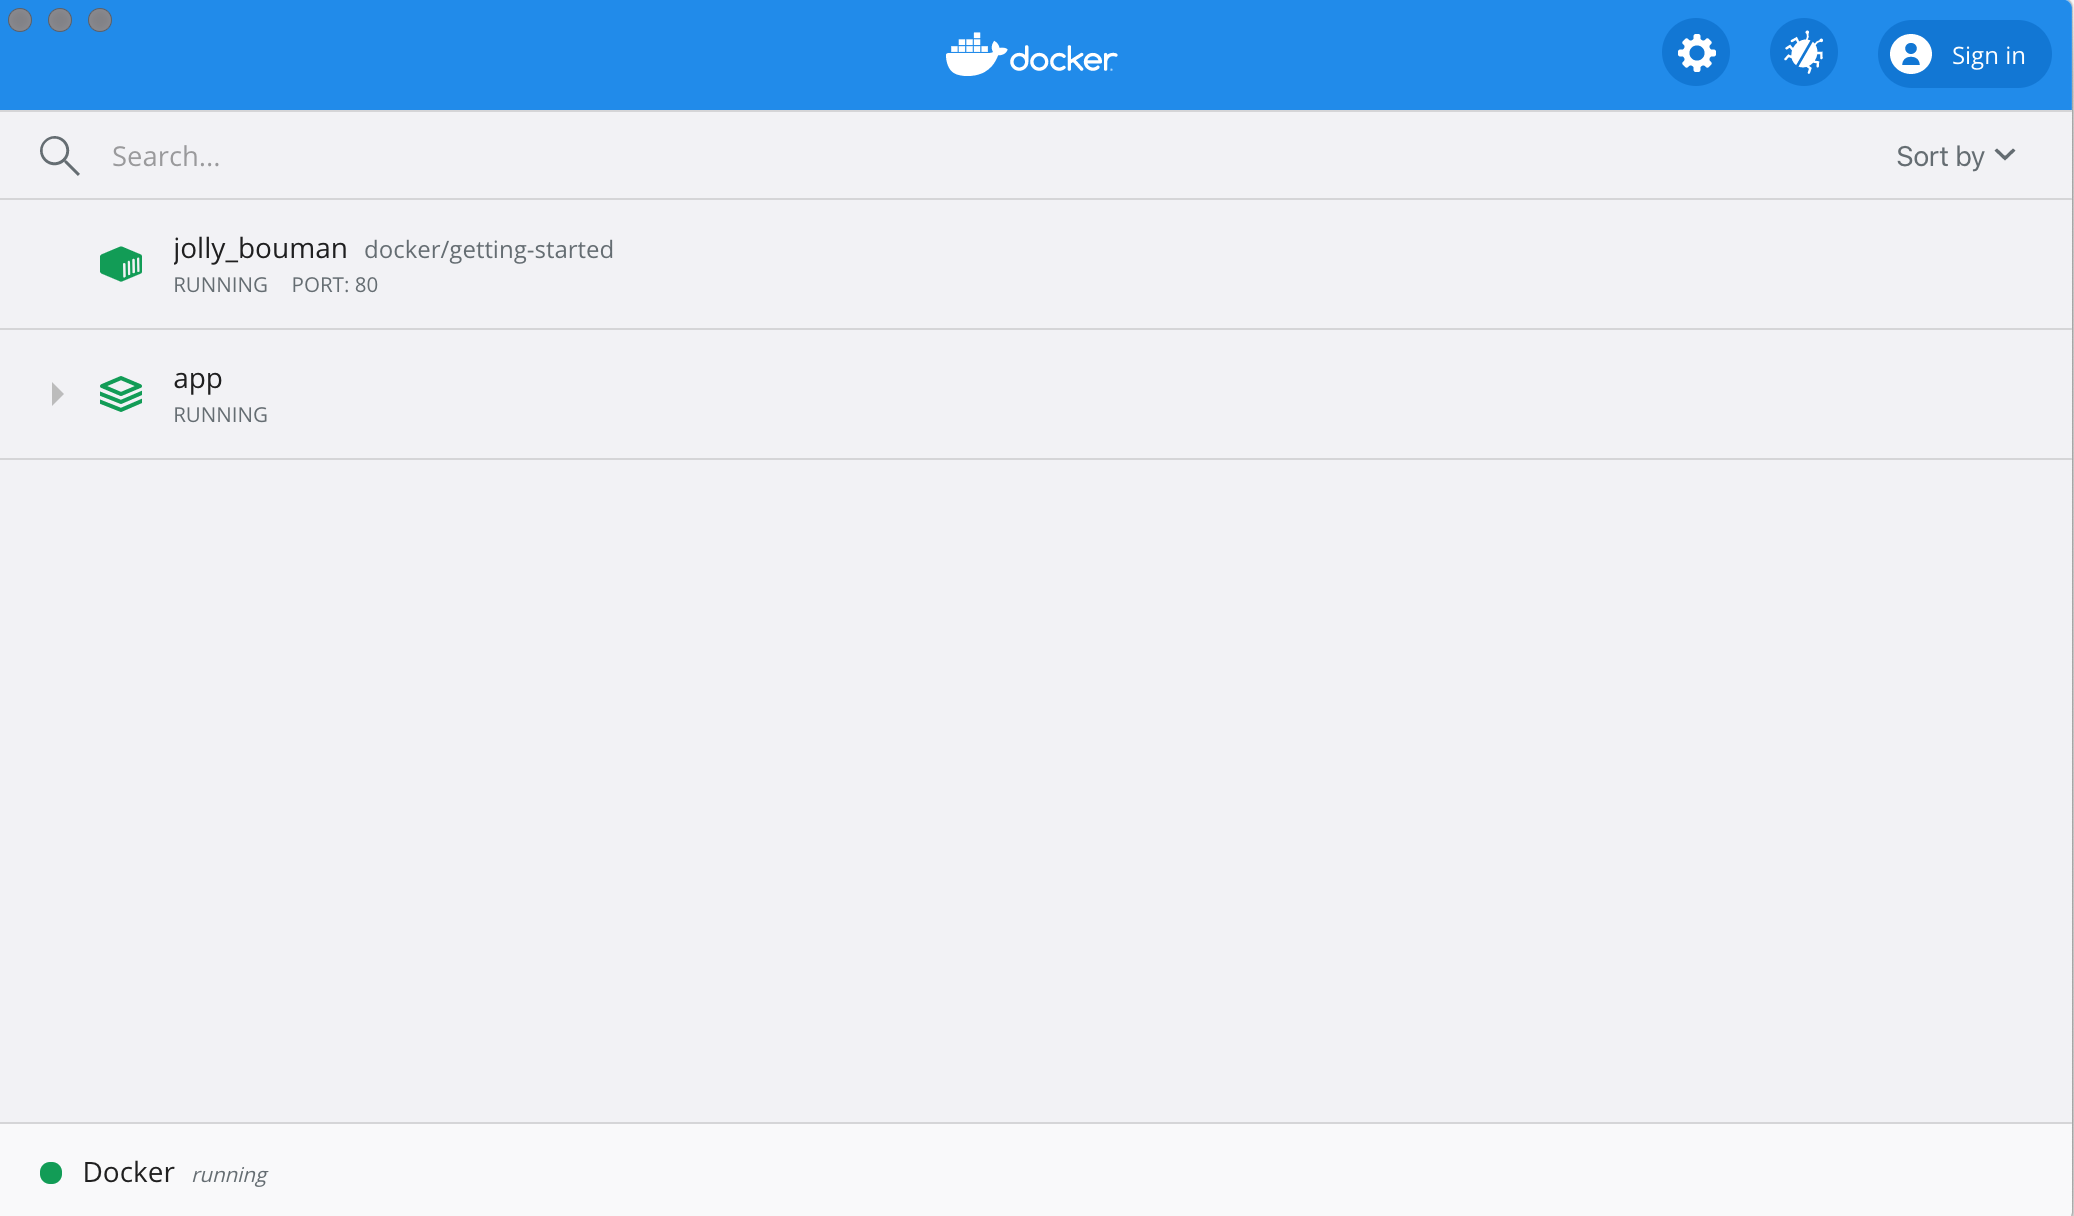
If you twirl down the app, you will see the two containers we defined in the compose file. The names are also a little more descriptive, as they follow the pattern of <project-name>_<service-name>_<replica-number>. So, it’s very easy to quickly see what container is our app and which container is the mysql database.

Tearing it All Down
When you’re ready to tear it all down, simply run docker-compose down or hit the trash can on the Docker Dashboard for the entire app. The containers will stop and the network will be removed.
By default, named volumes in your compose file are NOT removed when running
docker-compose down. If you want to remove the volumes, you will need to add the--volumesflag.The Docker Dashboard does not remove volumes when you delete the app stack.
Once torn down, you can switch to another project, run docker-compose up and be ready to contribute to that project! It really
doesn’t get much simpler than that!
Recap\
In this section, we learned about Docker Compose and how it helps us dramatically simplify the defining and sharing of multi-service applications. We created a Compose file by translating the commands we were using into the appropriate compose format.
At this point, we’re starting to wrap up the tutorial. However, there are a few best practices about image building we want to cover, as there is a big issue with the Dockerfile we’ve been using. So, let’s take a look!
Image Building Best Practices
Security Scanning
When you have built an image, it is good practice to scan it for security vulnerabilities using the docker scan command. Docker has partnered with Snyk to provide the vulnerability scanning service.
For example, to scan the getting-started image you created earlier in the tutorial, you can just type
docker scan getting-started
The scan uses a constantly updated database of vulnerabilities, so the output you see will vary as new vulnerabilities are discovered, but it might look something like this:
✗ Low severity vulnerability found in freetype/freetype
  Description: CVE-2020-15999
  Info: https://snyk.io/vuln/SNYK-ALPINE310-FREETYPE-1019641
  Introduced through: freetype/freetype@2.10.0-r0, gd/libgd@2.2.5-r2
  From: freetype/freetype@2.10.0-r0
  From: gd/libgd@2.2.5-r2 > freetype/freetype@2.10.0-r0
  Fixed in: 2.10.0-r1

✗ Medium severity vulnerability found in libxml2/libxml2
  Description: Out-of-bounds Read
  Info: https://snyk.io/vuln/SNYK-ALPINE310-LIBXML2-674791
  Introduced through: libxml2/libxml2@2.9.9-r3, libxslt/libxslt@1.1.33-r3, nginx-module-xslt/nginx-module-xslt@1.17.9-r1
  From: libxml2/libxml2@2.9.9-r3
  From: libxslt/libxslt@1.1.33-r3 > libxml2/libxml2@2.9.9-r3
  From: nginx-module-xslt/nginx-module-xslt@1.17.9-r1 > libxml2/libxml2@2.9.9-r3
  Fixed in: 2.9.9-r4
The output lists the type of vulnerability, a URL to learn more, and importantly which version of the relevant library fixes the vulnerability.
There are several other options, which you can read about in the docker scan documentation.
As well as scanning your newly built image on the command line, you can also configure Docker Hub to scan all newly pushed images automatically, and you can then see the results in both Docker Hub and Docker Desktop.

Image Layering
Did you know that you can look at what makes up an image? Using the docker image history command, you can see the command that was used to create each layer within an image.
-
Use the
docker image historycommand to see the layers in thegetting-startedimage you created earlier in the tutorial.docker image history getting-startedYou should get output that looks something like this (dates/IDs may be different).
   IMAGE               CREATED             CREATED BY                                      SIZE                COMMENT
   a78a40cbf866        18 seconds ago      /bin/sh -c #(nop)  CMD ["node" "src/index.j…    0B
   f1d1808565d6        19 seconds ago      /bin/sh -c yarn install --production            85.4MB
   a2c054d14948        36 seconds ago      /bin/sh -c #(nop) COPY dir:5dc710ad87c789593…   198kB
   9577ae713121        37 seconds ago      /bin/sh -c #(nop) WORKDIR /app                  0B
   b95baba1cfdb        13 days ago         /bin/sh -c #(nop)  CMD ["node"]                 0B
   <missing>           13 days ago         /bin/sh -c #(nop)  ENTRYPOINT ["docker-entry…   0B
   <missing>           13 days ago         /bin/sh -c #(nop) COPY file:238737301d473041…   116B
   <missing>           13 days ago         /bin/sh -c apk add --no-cache --virtual .bui…   5.35MB
   <missing>           13 days ago         /bin/sh -c #(nop)  ENV YARN_VERSION=1.21.1      0B
   <missing>           13 days ago         /bin/sh -c addgroup -g 1000 node     && addu…   74.3MB
   <missing>           13 days ago         /bin/sh -c #(nop)  ENV NODE_VERSION=12.14.1     0B
   <missing>           13 days ago         /bin/sh -c #(nop)  CMD ["/bin/sh"]              0B
   <missing>           13 days ago         /bin/sh -c #(nop) ADD file:e69d441d729412d24…   5.59MB
Each of the lines represents a layer in the image. The display here shows the base at the bottom with the newest layer at the top. Using this, you can also quickly see the size of each layer, helping diagnose large images.
-
You’ll notice that several of the lines are truncated. If you add the
--no-truncflag, you’ll get the full output (yes… funny how you use a truncated flag to get untruncated output, huh?)docker image history --no-trunc getting-started
Layer Caching
Now that you’ve seen the layering in action, there’s an important lesson to learn to help decrease build times for your container images.
Once a layer changes, all downstream layers have to be recreated as well
Let’s look at the Dockerfile we were using one more time…
FROM node:12-alpine
WORKDIR /app
COPY . .
RUN yarn install --production
CMD ["node", "src/index.js"]
Going back to the image history output, we see that each command in the Dockerfile becomes a new layer in the image. You might remember that when we made a change to the image, the yarn dependencies had to be reinstalled. Is there a way to fix this? It doesn’t make much sense to ship around the same dependencies every time we build, right?
To fix this, we need to restructure our Dockerfile to help support the caching of the dependencies. For Node-based applications, those dependencies are defined in the package.json file. So, what if we copied only that file in first, install the dependencies, and then copy in everything else? Then, we only recreate the yarn dependencies if there was a change to the package.json. Make sense?
-
Update the Dockerfile to copy in the
package.jsonfirst, install dependencies, and then copy everything else in.FROM node:12-alpine WORKDIR /app COPY package.json yarn.lock ./ RUN yarn install --production COPY . . CMD ["node", "src/index.js"] -
Create a file named
.dockerignorein the same folder as the Dockerfile with the following contents.node_modules.dockerignorefiles are an easy way to selectively copy only image relevant files. You can read more about this here. In this case, thenode_modulesfolder should be omitted in the secondCOPYstep because otherwise, it would possibly overwrite files which were created by the command in theRUNstep. For further details on why this is recommended for Node.js applications and other best practices, have a look at their guide on Dockerizing a Node.js web app. -
Build a new image using
docker build.docker build -t getting-started .You should see output like this…
Sending build context to Docker daemon  219.1kB
Step 1/6 : FROM node:12-alpine
---> b0dc3a5e5e9e
Step 2/6 : WORKDIR /app
---> Using cache
---> 9577ae713121
Step 3/6 : COPY package.json yarn.lock ./
---> bd5306f49fc8
Step 4/6 : RUN yarn install --production
---> Running in d53a06c9e4c2
yarn install v1.17.3
[1/4] Resolving packages...
[2/4] Fetching packages...
info fsevents@1.2.9: The platform "linux" is incompatible with this module.
info "fsevents@1.2.9" is an optional dependency and failed compatibility check. Excluding it from installation.
[3/4] Linking dependencies...
[4/4] Building fresh packages...
Done in 10.89s.
Removing intermediate container d53a06c9e4c2
---> 4e68fbc2d704
Step 5/6 : COPY . .
---> a239a11f68d8
Step 6/6 : CMD ["node", "src/index.js"]
---> Running in 49999f68df8f
Removing intermediate container 49999f68df8f
---> e709c03bc597
Successfully built e709c03bc597
Successfully tagged getting-started:latest
You’ll see that all layers were rebuilt. Perfectly fine since we changed the Dockerfile quite a bit.
-
Now, make a change to the
src/static/index.htmlfile (like change the<title>to say “The Awesome Todo App”). -
Build the Docker image now using
docker build -t getting-started .again. This time, your output should look a little different.Sending build context to Docker daemon 219.1kB Step 1/6 : FROM node:12-alpine ---> b0dc3a5e5e9e Step 2/6 : WORKDIR /app ---> Using cache ---> 9577ae713121 Step 3/6 : COPY package.json yarn.lock ./ ---> Using cache ---> bd5306f49fc8 Step 4/6 : RUN yarn install --production ---> Using cache ---> 4e68fbc2d704 Step 5/6 : COPY . . ---> cccde25a3d9a Step 6/6 : CMD ["node", "src/index.js"] ---> Running in 2be75662c150 Removing intermediate container 2be75662c150 ---> 458e5c6f080c Successfully built 458e5c6f080c Successfully tagged getting-started:latestFirst off, you should notice that the build was MUCH faster! And, you’ll see that steps 1-4 all have
Using cache. So, hooray! We’re using the build cache. Pushing and pulling this image and updates to it will be much faster as well. Hooray!
Multi-Stage Builds
While we’re not going to dive into it too much in this tutorial, multi-stage builds are an incredibly powerful tool to help use multiple stages to create an image. There are several advantages for them:
- Separate build-time dependencies from runtime dependencies
- Reduce overall image size by shipping only what your app needs to run
Maven/Tomcat Example
When building Java-based applications, a JDK is needed to compile the source code to Java bytecode. However, that JDK isn’t needed in production. Also, you might be using tools like Maven or Gradle to help build the app. Those also aren’t needed in our final image. Multi-stage builds help.
FROM maven AS build
WORKDIR /app
COPY . .
RUN mvn package

FROM tomcat
COPY --from=build /app/target/file.war /usr/local/tomcat/webapps
In this example, we use one stage (called build) to perform the actual Java build using Maven. In the second stage (starting at FROM tomcat), we copy in files from the build stage. The final image is only the last stage being created (which can be overridden using the --target flag).
React Example
When building React applications, we need a Node environment to compile the JS code (typically JSX), SASS stylesheets, and more into static HTML, JS, and CSS. If we aren’t doing server-side rendering, we don’t even need a Node environment for our production build. Why not ship the static resources in a static nginx container?
FROM node:12 AS build
WORKDIR /app
COPY package* yarn.lock ./
RUN yarn install
COPY public ./public
COPY src ./src
RUN yarn run build

FROM nginx:alpine
COPY --from=build /app/build /usr/share/nginx/html
Here, we are using a node:12 image to perform the build (maximizing layer caching) and then copying the output into an nginx container. Cool, huh?
Recap`
By understanding a little bit about how images are structured, we can build images faster and ship fewer changes. Scanning images gives us confidence that the containers we are running and distributing are secure. Multi-stage builds also help us reduce overall image size and increase final container security by separating build-time dependencies from runtime dependencies.
What Next?
Although we’re done with our workshop, there’s still a LOT more to learn about containers! We’re not going to go deep-dive here, but here are a few other areas to look at next!
Container Orchestration
Running containers in production is tough. You don’t want to log into a machine and simply run a docker run or docker-compose up. Why not? Well, what happens if the containers die? How do you scale across several machines? Container orchestration solves this problem. Tools like Kubernetes, Swarm, Nomad, and ECS all help solve this problem, all in slightly different ways.
The general idea is that you have “managers” who receive expected state. This state might be “I want to run two instances of my web app and expose port 80.” The managers then look at all of the machines in the cluster and delegate work to “worker” nodes. The managers watch for changes (such as a container quitting) and then work to make actual state reflect the expected state.
Cloud Native Computing Foundation Projects
The CNCF is a vendor-neutral home for various open-source projects, including Kubernetes, Prometheus, Envoy, Linkerd, NATS, and more! You can view the graduated and incubated projects here and the entire CNCF Landscape here. There are a LOT of projects to help solve problems around monitoring, logging, security, image registries, messaging, and more!
So, if you’re new to the container landscape and cloud-native application development, welcome! Please connect to the community, ask questions, and keep learning! We’re excited to have you!